Financing available through HFS FinancialView financing options
← Back to ADDRAC Construction
ADDRAC field notes · building science

Build the home as a complete enclosure.

Opens: Loading…

An energy-efficient, weather-sealed, pest-resistant home is not created by one insulation product. It comes from connecting the foundation, walls, windows, doors, roof, attic, cladding, drainage, and HVAC into one coordinated system.

Austin · Leander · Georgetown · Dripping Springs · Texas Hill Country
Local starting pointAustin and the surrounding Hill Country are hot-weather markets with significant cooling demand, wind-driven rain, humidity, intense sun, and termite exposure. The exact energy-code climate zone and requirements depend on the project jurisdiction and adopted code edition, so the final assembly must be checked against the plans, energy model, and code official.

Five control layers have to work together.

A durable home manages water, air, heat, vapor, and pests. The layers may be made from different products, but they must connect continuously at corners, wall bases, windows, doors, roof transitions, penetrations, and changes in material.

01WaterRoofing, flashing, drainage planes, window pans, kick-outs, gutters, and site grading.
02AirContinuous air barrier, sealed plates, rim joists, penetrations, ducts, and rough openings.
03ThermalInsulation, reduced thermal bridging, roof/attic strategy, windows, doors, and shading.
04VaporClimate-appropriate drying and vapor control; not automatically a plastic sheet everywhere.
05PestsTermite detailing, screened openings, sealed penetrations, durable clearances, and maintenance.

The highest-performing products cannot compensate for a discontinuity at the wall base, an unflashed window, a wet roof-to-wall connection, or an attic full of unsealed penetrations.

Start with the climate and the enclosure strategy.

Hot-weather priorities

  • Limit solar heat gain with roof, window, orientation, exterior shading, and glass selection.
  • Control humidity with correctly sized HVAC, adequate ventilation, and a wall/roof assembly that can dry safely.
  • Keep ducts and air handlers inside the conditioned envelope when practical.
  • Build a continuous air barrier so cooled air does not leak into attics, wall cavities, or roof assemblies.
  • Design for wind-driven rain, splashback, drainage, and termite inspection access.

Why “more insulation” is not enough

Insulation reduces conductive heat flow, but air movement can bypass it. A highly insulated wall with gaps around plates, windows, ducts, and electrical penetrations can perform worse than a simpler assembly that is continuous and carefully sealed.

The goal is not the highest R-value in isolation. The goal is a balanced assembly that manages heat, air, moisture, water, durability, and cost together.

sidingdrainagesheathing + framingairinsulationvaporinteriorrain controlstructurethermal controlfinish
Illustrative wall section: the exact location of the primary water, air, vapor, and thermal control layers changes by climate, material, and design. The important part is continuity.

Sheathing: structure, water, and air.

Sheathing is not just the surface under the siding. Depending on the product and detailing, it can contribute to structural bracing, water management, air control, thermal performance, and the attachment base for exterior materials.

Sheathing / panel approachStrengthsTradeoffs and cost considerationsBest question to ask
OSB structural sheathingCommon, efficient, readily available, and useful for wall bracing when detailed correctly.Edges, penetrations, seams, and the exterior water-control layer still need careful treatment. Panel exposure and moisture management matter.Where is the primary water-resistive barrier and how are seams, windows, and penetrations integrated?
Plywood structural sheathingGood fastening and panel performance; familiar for many structural and high-wind details.Often costs more than OSB; the system still needs a complete WRB, flashing, and air-sealing strategy.Is the upgrade solving a structural, moisture, or fastening requirement—or only adding material cost?
Integrated sheathing / WRB panelCan combine structural sheathing and a water-resistive air barrier with taped seams.More expensive material and tape/installation requirements; penetrations and transitions must be executed consistently.Who owns the seam-taping, flashing, window details, and pre-drywall inspection?
Exterior rigid insulationReduces thermal bridging and can improve whole-wall performance when thickness, fastening, and drying are designed correctly.Adds material, longer fasteners, furring, trim depth, and more complicated window/door and siding attachment details.How will the insulation, WRB, windows, siding, and structural attachments line up?
SIPs, ICFs, or panelized systemsCan provide a highly continuous insulated enclosure and reduce some field assembly.Requires early design coordination, specialized installation, transportation, engineering, and trade familiarity.What is the complete installed system cost, including openings, service chases, finishes, and local labor?
structural OSB panel

OSB / plywood

Structural panels brace the wall. They still need a coordinated WRB, flashing, taped seams where specified, and sealed penetrations.

sidingstudsrigidWRBcontinuous exterior insulation

Exterior insulation

The added layer crosses over studs, reducing thermal bridging. It also changes fasteners, trim depth, and window/door details.

sidinggapWRBstudinsulationdrainage + ventilation space

Rainscreen

Furring creates a drainage and drying space behind cladding. It is a system detail—not a substitute for flashing or a WRB.

Wall framing options.

Conventional 2×6 framing

  • Pros: familiar trades, flexible field changes, straightforward attachment, and a large cavity for batt or blown insulation.
  • Cons: studs and headers create thermal bridges; crowded corners and multi-stud openings can reduce insulation continuity.
  • Good fit: many Austin-area homes when the air barrier, insulation installation, windows, and flashing are carefully coordinated.

Advanced / OVE framing

  • Pros: fewer unnecessary studs and more insulation area; can reduce thermal bridging and material use.
  • Cons: requires precise plans, trade coordination, drywall backing, headers, corners, and inspection familiarity.
  • Good fit: projects where the framing plan and enclosure goals are coordinated before construction.

Double-stud walls

  • Pros: deeper insulation cavity and fewer direct wood bridges across the full wall thickness.
  • Cons: thicker walls, deeper window/door openings, more material, more detailing, and potential moisture/drying questions.
  • Good fit: high-performance designs where wall thickness and detailing are intentionally planned.

ICF or SIP construction

  • Pros: highly insulated, continuous systems with fewer conventional framing interruptions.
  • Cons: specialized crews, engineering, attachment details, service chases, and potentially higher design or mobilization costs.
  • Good fit: projects with a builder and design team experienced in that specific system.

Insulation: choose the material for the job.

Insulation typeProsConsTypical uses
Fiberglass battsWidely available, economical, familiar, and easy to replace.Performance drops when compressed, gapped, poorly cut, or bypassed by air leaks; does not automatically create the air barrier.Walls, floors, and attic slopes when installed carefully inside a sealed assembly.
Blown fiberglass or celluloseCan fill irregular attic areas and reduce installation gaps; cellulose adds some sound and material benefits.Needs correct density, depth markers, air sealing below, and baffles at eaves; settling or wind washing can reduce performance if poorly installed.Attic floors, some dense-packed wall systems, and retrofit conditions.
Mineral woolGood fire, sound, and moisture tolerance; dense batts can fit certain wall and mechanical applications.Often costs more than basic fiberglass and still needs a separate air-control layer.Walls, fire-rated areas, mechanical rooms, and acoustic assemblies.
Open-cell spray foamFills irregular cavities and can contribute to air sealing when installed to the required thickness.Lower R-value per inch than closed-cell foam; moisture and vapor behavior must be designed for the climate and assembly.Roof decks, difficult cavities, and targeted air-sealing—not automatically every wall.
Closed-cell spray foamHigh R-value per inch, air sealing, and some moisture resistance in appropriate assemblies.Higher cost, installation quality and thickness matter, and it can complicate drying or future inspection/repair.Limited-depth areas, rim joists, roof decks, and targeted high-performance details.
Rigid exterior insulationReduces thermal bridging and can improve whole-wall R-value outside the framing.Requires careful fastening, window/door extension, furring, flashing, fire, and cladding design.High-performance wall and roof assemblies with coordinated details.
fiberglass batt in cavity

Fiberglass batt

Economical and familiar, but it must be cut to fit tightly. It is insulation—not the air barrier.

spray foam at cavity / edge

Spray foam

Can fill irregular areas and air-seal when properly specified and installed, but costs more and changes drying behavior.

air barrier / ceilingattic insulationsoffit bafflevented attic section

Attic insulation + baffle

Attic-floor insulation performs best when the ceiling air barrier is sealed and eave ventilation is protected from wind washing.

Air-sealing comes before insulationSeal top plates, bottom plates, rim joists, penetrations, duct and plumbing openings, electrical boxes, rough openings, and attic-floor bypasses before insulation hides the work. ENERGY STAR and DOE guidance both treat air sealing and insulation as related but distinct tasks.

Vented attic or conditioned attic?

Vented attic

Insulation usually sits on the ceiling plane. The attic stays outside the conditioned envelope, with soffit-to-ridge or other designed ventilation. The ceiling must be the continuous air barrier, and penetrations must be sealed before insulation is installed.

  • Pros: often lower first cost, familiar, accessible, and easier to inspect.
  • Cons: ducts and equipment may live in a hot space; wind washing, penetrations, and uneven insulation can reduce performance.

Conditioned / unvented attic

The thermal and air-control layer moves to the roofline, bringing the attic or roof volume inside the conditioned envelope. The roof assembly must be designed for moisture, ventilation or unvented requirements, insulation, and HVAC operation.

  • Pros: ducts and equipment can operate in a more stable environment; useful for vaulted ceilings and complicated roof geometry.
  • Cons: higher cost, more roof-deck detailing, more difficult leak detection, and greater consequences if the assembly is incorrectly designed.
Do not mix the strategies casuallyA roof deck sprayed with foam, a vented roof, and an attic-floor insulation plan are different assemblies. The plans should identify the air barrier, insulation plane, vapor strategy, ventilation approach, and HVAC location.

The wall base is a small detail with a big job.

Where the wall meets the foundation is a common place for air, water, and insects to enter. A weather-sealed wall base is built in layers—not with one bead of caulk alone.

concrete foundationsill gasket + sealed anchor boltsinsulation / air barrierWRB + siding / drainage
Conceptual only: use the project’s structural and waterproofing details. DOE guidance identifies the sill gasket, sealed joints, anchor-bolt penetrations, rim-joist sealing, and termite detailing as important parts of the connection.

Weather and air control

  • Sill gasket or sill sealer between concrete and the sill plate.
  • Seal joints, corners, anchor-bolt penetrations, rim joists, and the wall-to-floor transition.
  • Connect the wall air barrier to the foundation or slab-edge strategy.

Pest and water control

  • Termite shield or approved termite detailing where required.
  • Keep wood and siding clearances above finished grade and slope soil away from the home.
  • Use flashing, drainage, and sealants appropriate to the cladding—not caulk as the only defense.

Rainscreens and siding: let the wall dry.

A rainscreen is a drainage and ventilation space behind siding or veneer. It gives incidental water a path to drain and can improve drying when the rest of the wall is detailed correctly.

CladdingProsCons / cost considerationsWeather-sealing priorities
Fiber-cement sidingDurable, familiar, paintable, and available in many profiles.Heavy; joints, penetrations, clearances, and paint maintenance matter.WRB, flashing, proper laps, joints, penetrations, and a drainage gap where designed.
Engineered wood sidingWarm appearance, lighter handling, and useful profile options.Needs careful end sealing, clearances, paint/coating maintenance, and water management.Back-ventilation, WRB integration, bottom edges, joints, and window/door flashing.
Stucco / hardcoatContinuous visual finish and strong regional aesthetic.Cracking and water intrusion risk if the drainage, lath, joints, and transitions are poorly detailed.Drainage plane, weeps, flashings, control joints, penetrations, and compatible sealants.
Stone or brick veneerDurable, regional, and visually substantial.Heavy, labor-intensive, and dependent on shelf angles, flashing, weeps, and drainage space.Continuous WRB, cavity drainage, base flashing, weeps, and properly integrated openings.
Metal siding / panelsDurable, modern, and often lower-maintenance.Thermal movement, oil-canning, fastener layout, acoustics, and trim details require coordination.WRB, furring or clips, movement joints, penetrations, and compatible flashing.
Rainscreen principleThe siding is the first rain defense, not the only water-control layer. A well-detailed wall assumes some water gets behind the cladding and gives it a controlled way out.

Windows and doors are high-value openings.

Selection

  • Review U-factor, solar heat-gain coefficient, visible transmittance, air leakage, frame material, glazing, and orientation—not just the brand or color.
  • Large west-facing glass may need different solar-control decisions than shaded north-facing glass.
  • Entry doors, multi-slide doors, garage-to-house doors, and threshold details deserve the same attention as windows.

Installation

  • Use a sill pan or approved sill-flashing strategy, integrate jamb flashing, and install head flashing where required.
  • Connect the window/door flashing to the WRB and drainage plane in shingle fashion.
  • Air-seal the rough opening perimeter without blocking drainage paths or over-compressing the frame.
  • Verify thresholds, slopes, overhangs, sealants, fasteners, and compatibility with siding and exterior insulation.

An expensive window installed with a broken sill pan or unsealed rough opening is still a weak part of the enclosure. Installation quality can matter as much as the product upgrade.

Where the money goes.

High-performance construction usually adds cost through additional materials, more labor, more design coordination, and more inspection or testing. The best return often comes from continuity and workmanship before exotic products.

Lower added cost

Seal the transitions

Sill gasket, caulk, compatible tapes, flashing, foam at targeted penetrations, sealed top/bottom plates, and a documented pre-drywall inspection.

Moderate added cost

Upgrade the enclosure

Better windows, exterior continuous insulation, rainscreen furring, improved attic strategy, insulated ducts, and additional air-sealing labor.

Higher added cost

Change the system

ICF, SIPs, double-stud walls, conditioned roof assemblies, specialty glazing, complex shading, high-performance HVAC, and energy modeling.

A smart budget compares the full assembly. For example, the cost of exterior insulation includes the insulation, fasteners, furring, window extensions, trim changes, labor, and cladding attachments—not just the foam board.

A practical ADDRAC performance checklist.

  1. Confirm the project climate zone, adopted energy code, flood/wind requirements, termite requirements, and local inspection sequence.
  2. Choose the wall and roof assemblies before finalizing windows, doors, siding, trim depths, and mechanical locations.
  3. Draw the water, air, thermal, vapor, and pest-control layers continuously through every transition.
  4. Use a sill gasket, sealed plates, sealed rim joists, and a documented rough-opening flashing plan.
  5. Air-seal before insulation; install insulation uniformly; protect attic insulation from wind washing; and verify the work before concealment.
  6. Decide whether ducts and equipment belong inside a vented attic, a conditioned attic, or the conditioned interior.
  7. Provide a drainage plane behind siding or veneer and detail base flashing, kick-outs, head flashing, weeps, and penetrations.
  8. Commission the home: HVAC sizing, duct sealing, ventilation, blower-door testing, duct testing, and correction of obvious enclosure defects.
Questions for your builder:
  1. Where is the primary air barrier drawn on the plans?
  2. How is the wall base sealed to the foundation and protected from termites?
  3. What happens to water that gets behind the siding?
  4. How are windows and doors flashed into the WRB?
  5. Which attic strategy is being used, and where are the ducts?
  6. What testing or pre-drywall quality-control steps are included?
Real-world references

See the layers in actual construction.

The earlier conceptual sketches have been replaced with field photography and technical wall-cut references. These examples are for understanding the assemblies; the project plans, manufacturer instructions, and local code still control the final installation.

Technical cutaway of a ventilated rainscreen wall assembly with cladding, cavity, WRB, exterior insulation, sheathing, and stud framing
Technical wall cut: control layersThis labeled section shows how cladding, a ventilated cavity, the WRB/air barrier, exterior insulation, sheathing, and the insulated stud cavity work together. Image: Brink Design.
Workers installing aluminum rainscreen subframing over exterior insulation
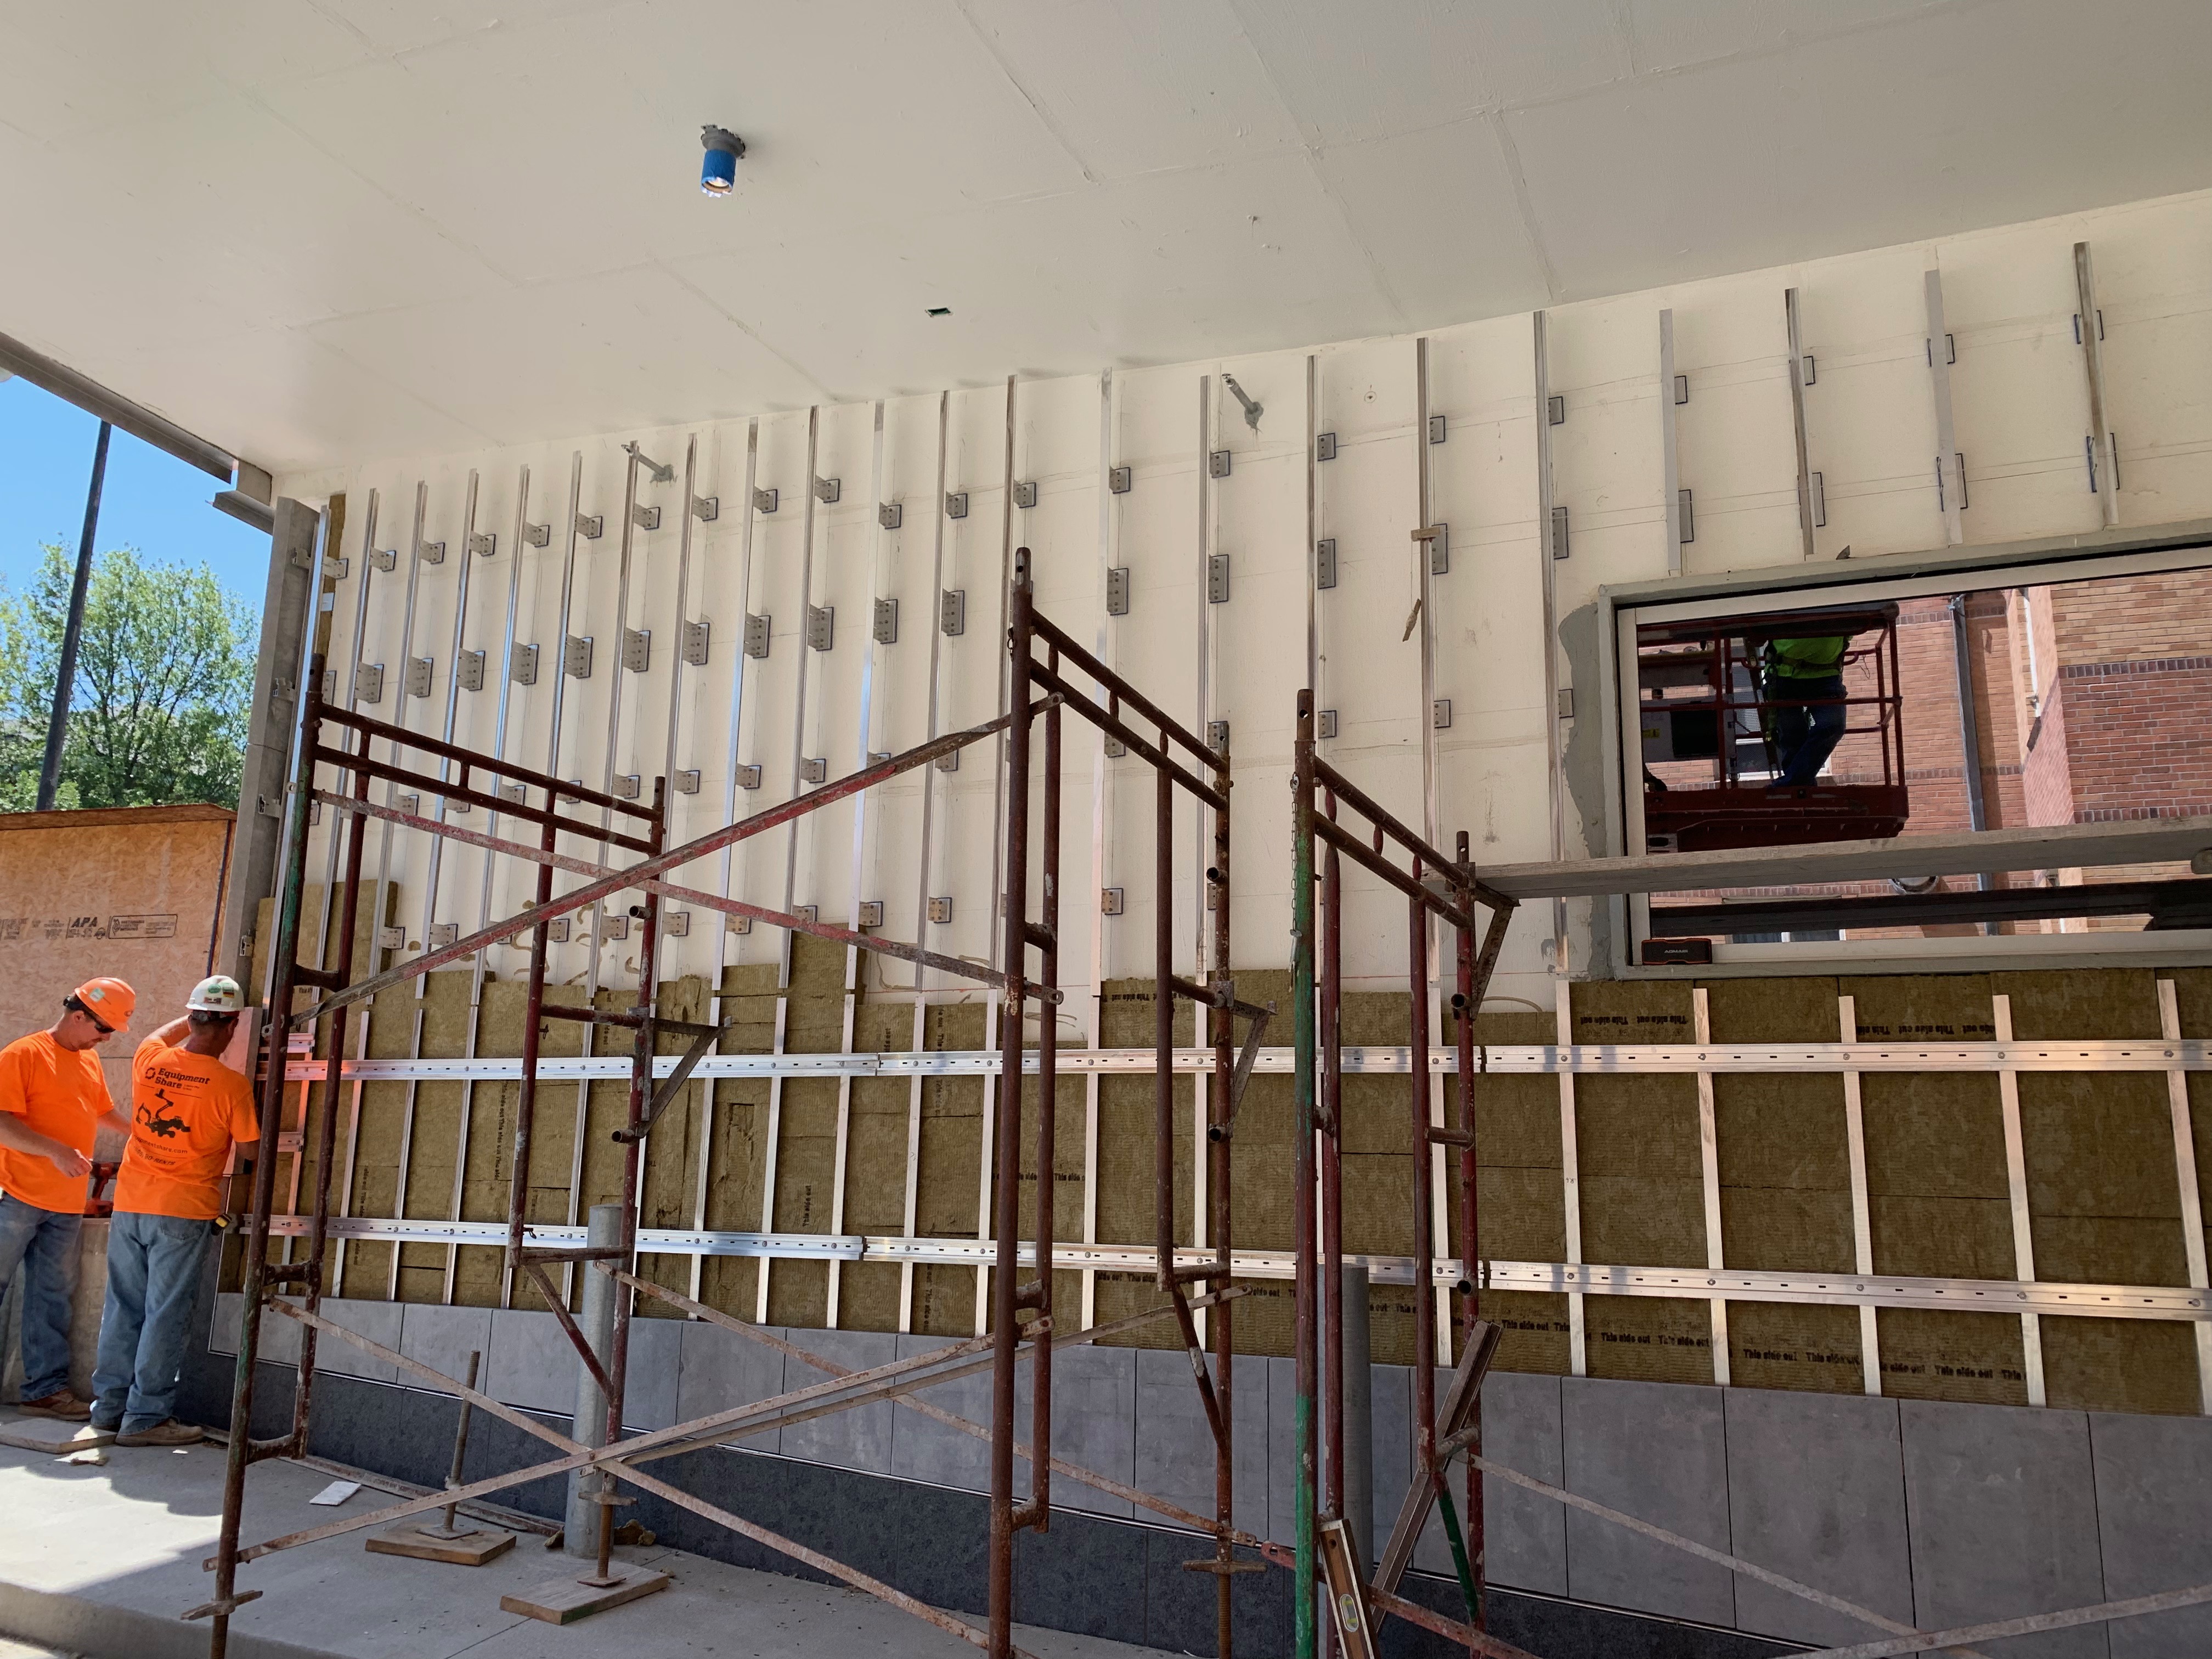
Rainscreen subframing in the fieldHere the outer cladding is being supported on rails over a drainage cavity and insulation. The cavity, attachment system, flashing, and cladding must be coordinated as one assembly. Image: ECO Cladding.
Workers installing mineral wool insulation and battens on a timber wall
Exterior insulation and furringThis jobsite view shows mineral wool insulation and the battens that will support a ventilated façade. Exterior insulation can reduce thermal bridging, but fasteners, window depth, trim, and WRB transitions must be designed around it. Image: dach+holzbau.
Black attic ventilation baffles installed between roof rafters
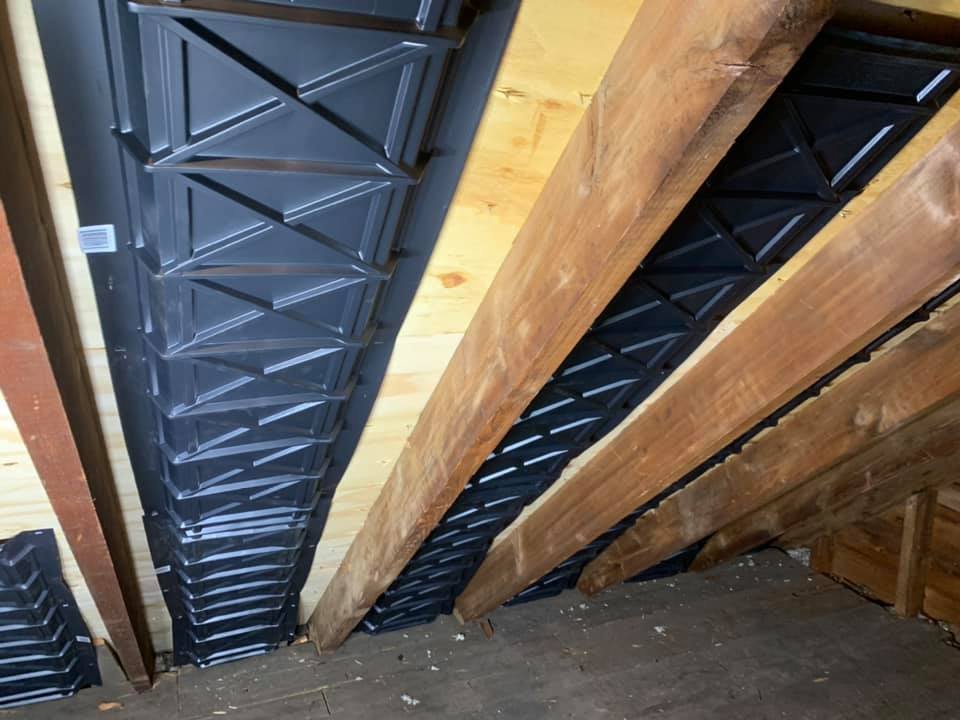
Attic baffles before insulationThe black channels preserve a continuous airflow path from the soffit while the roof framing is still visible. In a vented attic, the baffles and sealed ceiling plane work together; one does not replace the other. Image: Hammond RE-Engineered.
Black sill pan flashing and tape installed in a wood window rough opening
Window sill pan before the window goes inA sill pan creates a drainage path at the bottom of the rough opening. The jambs, head flashing, WRB, and window flange must then be integrated so water drains back to the exterior. Image: TLS Laboratories.
Pressure-treated sill plate and black gasket over a concrete foundation with anchor bolts
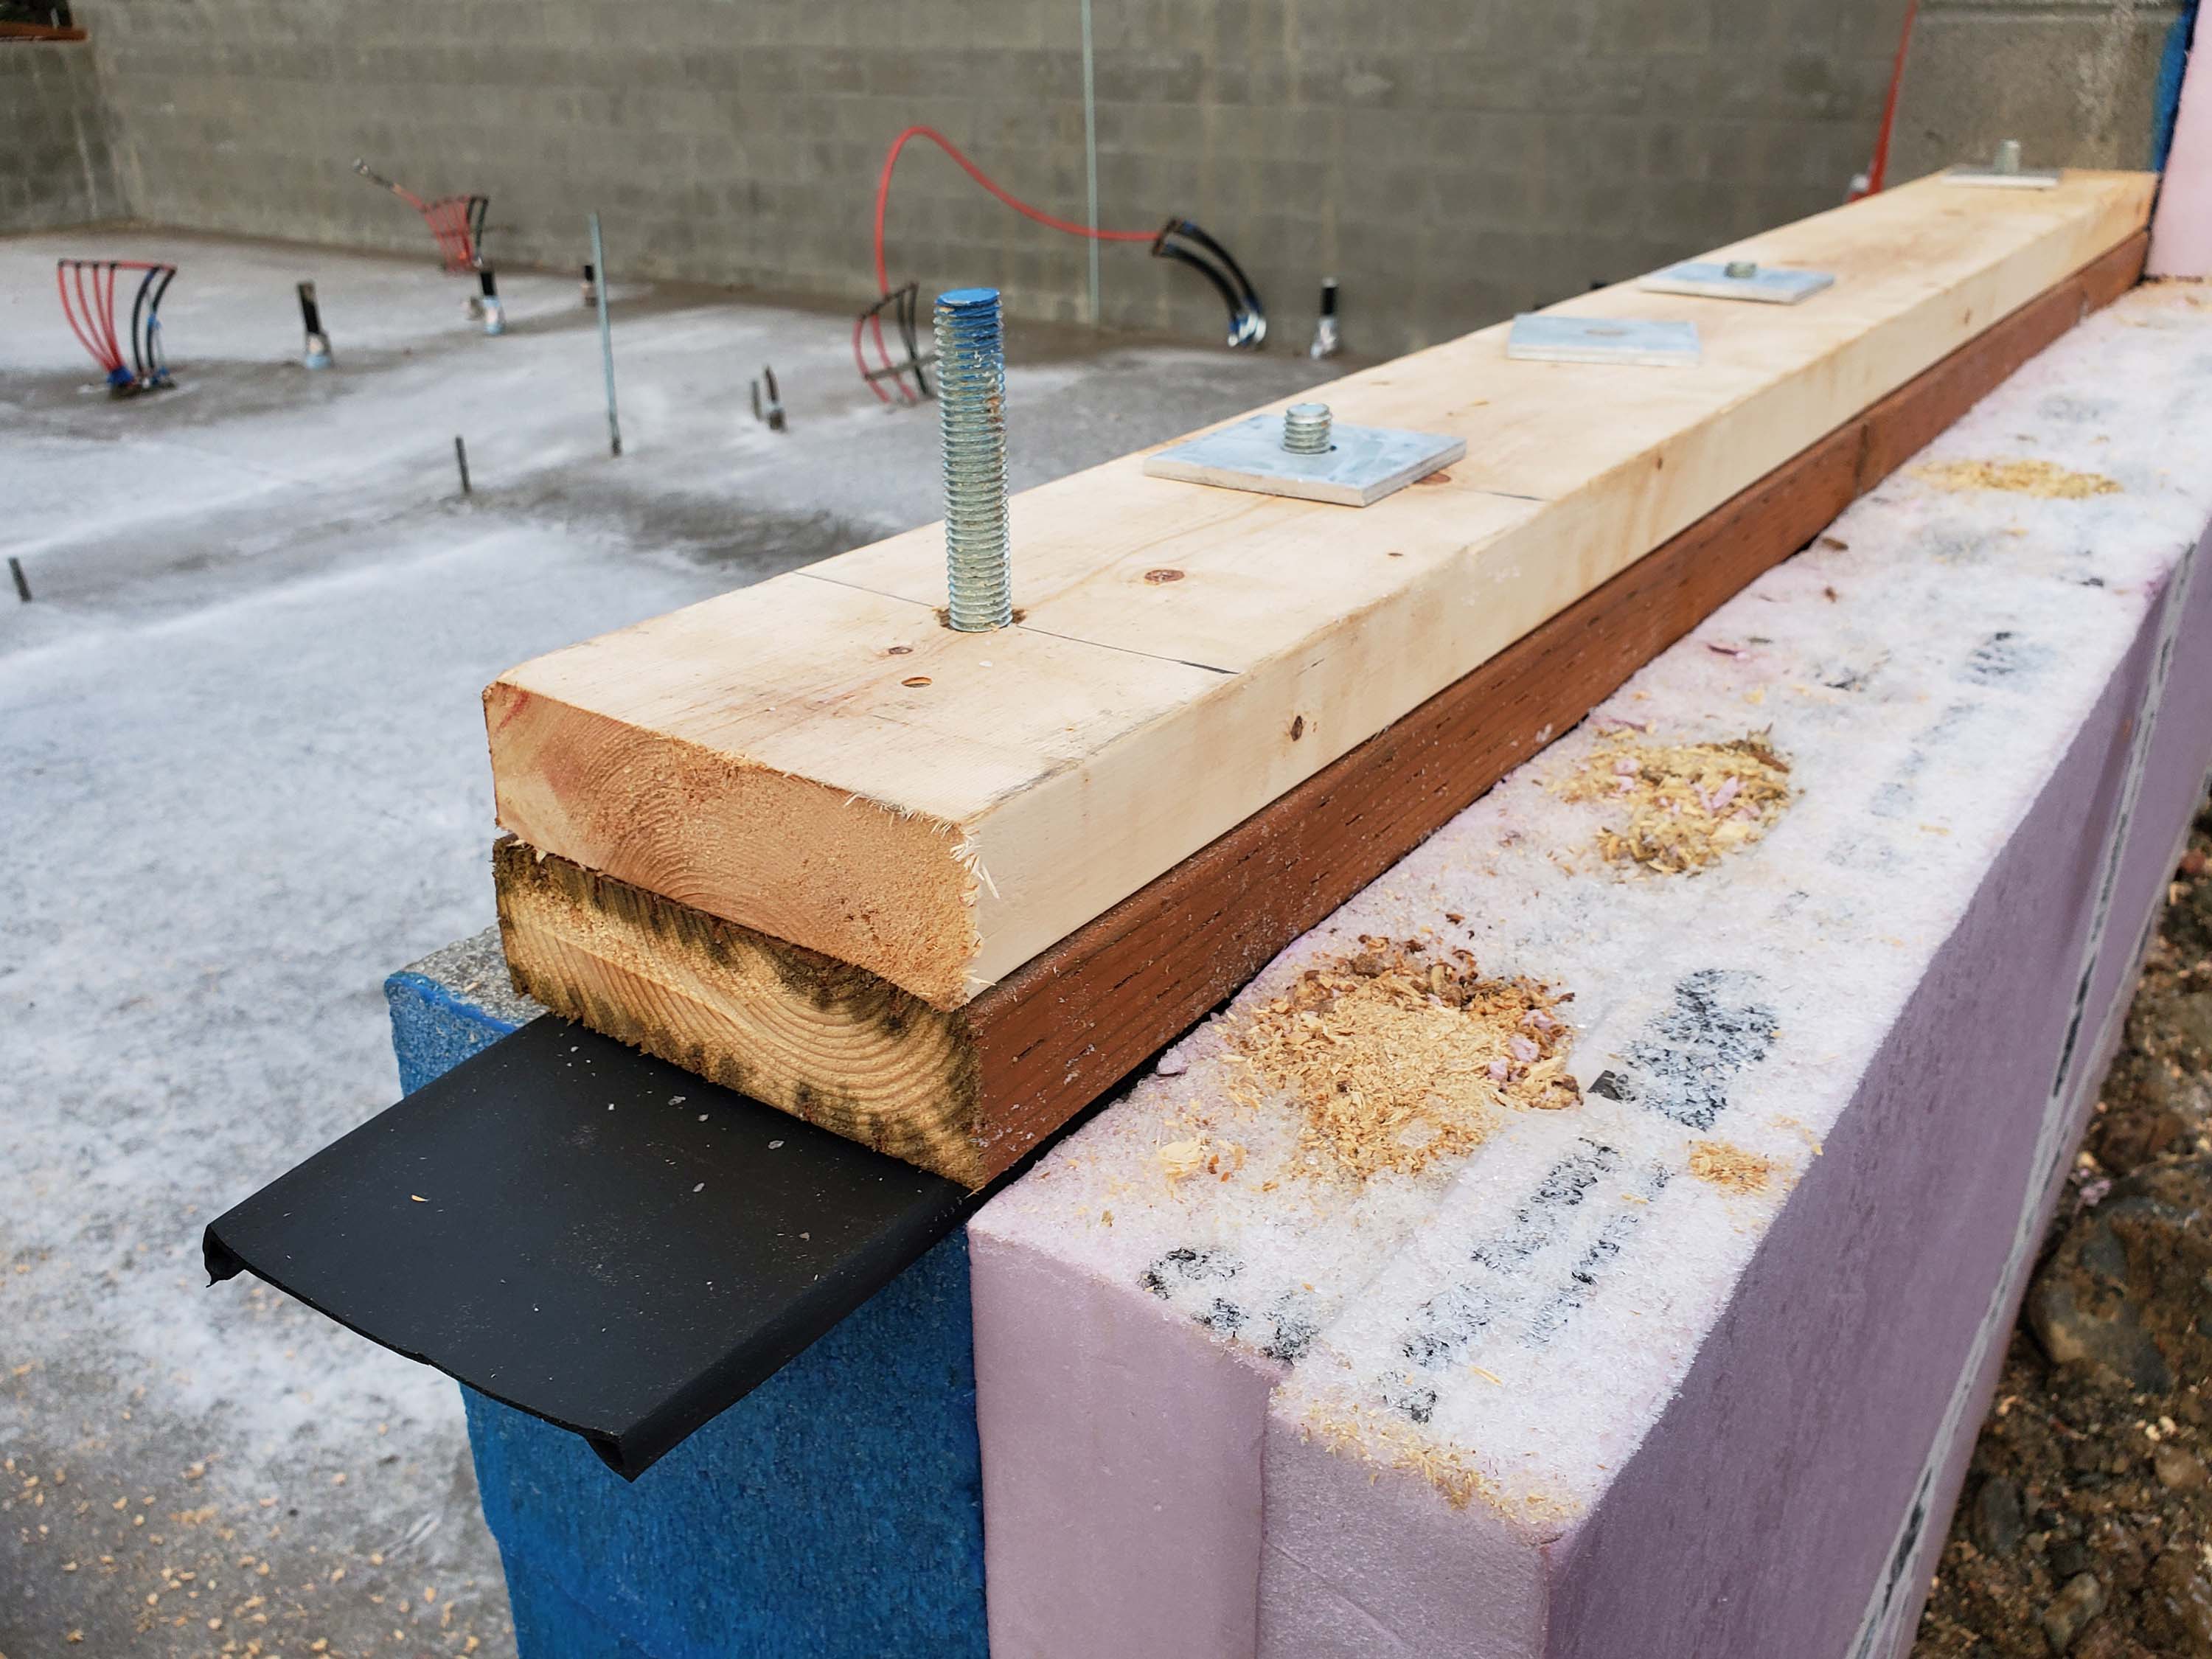
Sill plate, gasket, and anchor boltsThis foundation-to-wall connection shows the physical materials behind the wall-base discussion: treated sill plate, gasket, anchor bolts, and the concrete foundation. Air-sealing the joint and sealing penetrations completes the weather and air-control strategy. Image: AK House Project.